Windows 10 For Mac Bootcamp
Oct 16, 2018 - * On Mac computers with APFS-formatted disks, Boot Camp requires a partition rather than a volume. Find out if your Mac supports Windows 10. Get a Windows disk image. Open Boot Camp Assistant. Format your Windows partition. Install Windows and Windows Support Software. Switch between macOS and Windows. Install Windows 10 on mac OS Using Bootcamp Without USB Drive Step 1: Once the ISO download is completed, launch Boot Camp Assistant in Applications → Utilities. Step 2: Click the Choose button next to the ISO image box, and select the ISO file downloaded in. Step 3: This drastically shortens.
With support for ASP.NET Core in Visual Studio for Mac, you are empowered to create beautiful, modern web applications. Craft the front-end with the same web editor experience you know and love from Visual Studio and Windows and publish to the cloud directly from the IDE. Download Visual Studio Code to experience a redefined code editor, optimized for building and debugging modern web and cloud applications. Download Visual Studio Code - Mac, Linux, Windows This site uses cookies for analytics, personalized content and ads. 
Apple finally refreshed their with refreshed designs, a new Touch Bar and many controversial decisions when it comes to ports. Despite most reviews being ho-hum about the new hardware many users are still tied to the Apple ecosystem and feel obliged to continue with their hardware.
Different printer types. Nonetheless, if you do have a new MacBook Pro, you can still try the zesty new world of Windows 10 for free and little effort. Today, I'll show you how to do that and give you some tips on what to expect!
Update 29 January 2017: With new MacBooks comes a new guide. With Touch Bars and giant trackpads, there's now more to configure for an optimal Windows 10 experience. One of the main reasons Mac users want to use Windows is for the superior gaming experience. Additionally, there are still many Windows-only desktop apps that some users may want or need to run. Finally, there is just the allure. Windows 10 is making many headlines these days and what better way to nab some Apple fans than with a (virtually) free new operating system?
Apple makes the process of installing Windows 10 very comfortable. In this video, I'll show you how in about 45 minutes, you can load Microsoft's latest OS on any new MacBook Pro. In this case, we are using a 13-inch late-2016 MacBook Pro with 512 GB of storage, Touch Bar, and Intel Iris Graphics 550 for the article. In the video posted below, we're using a mid-2015 MacBook Pro 15-inch with Intel HD graphics. Nonetheless, the same principles apply.
How to get the Windows 10 ISO • Plug your USB drive into your MacBook. • In macOS, open Safari or your preferred web browser.
• Go to • Select your desired version of Windows 10. Most users should choose Windows 10 or Windows 10 Single Language ISOs. Note: The KN and N versions just have reduced (non-baked in) media capabilities due to legal challenges in South Korea and the European Commission from a ruling in 2004. They are best to skip.) • Click Confirm. • Select your desired language. • Click Confirm.
• Click on 64-bit download. • Save the ISO onto your USB drive. It is a large file (around 4GB), so the download may take a while depending on the speed of your internet connection.

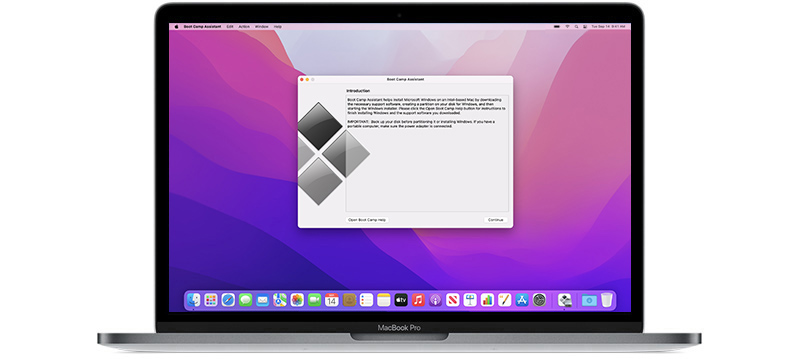
How to set up Boot Camp and install Windows 10 on a Mac Before continuing with the next steps, save anything you're working on,, and quit all running apps. Leave your ISO-carrying USB drive plugged in. • Open the Boot Camp Assistant app. You'll find it in the Utilities folder in Applications.
• Click Continue. Boot Camp Assistant will automatically locate the ISO file on your USB drive. • Click and drag on the partition slider to adjust how much space will be allocated to the Windows partition.
By default, 49GB will be set aside. You can leave the majority to macOS if that is your primary OS, or give most of it to Windows 10 — it's up to you, but you cannot resize the Windows 10 partition at a later point without deleting the entire Windows 10 install and starting over. • Click Install to start the process of partitioning the drive and installing Windows 10. You computer will restart automatically and without warning. You may see a black screen for several seconds as the partitioning process takes place. After the partitions are set, the Windows 10 installation will begin. The display drivers will not yet be scaling Widows 10, so everything will be tiny (we'll fix this later in this guide).