Outlook For Mac Outgoin Port Alternatives
Many email clients support autodiscover for automatically detecting server settings. If your email client is able to detect your email configuration from the email provider, it will look similar to this, and you may use the recommended settings: If your email client is unable to detect your email configuration from the email provider, it may attempt to recommend settings based on common server settings which are unlikely to be correct. The failure screen may look similar to this: If this happens, you may either use this article to enter the email settings manually, or you may wish to attempt to troubleshoot your autodiscover service using the following article: • The instructions listed below are for the general setup of various email clients and cannot be guaranteed to work with every email client. However, the following configuration settings are appropriate for all third party email clients, including Outlook, Thunderbird, iOS Mail and more. Third Party Email Client Features While we are able to provide assistance with configuration and basic troubleshooting for third party email programs, the amount of assistance that can be provided by HostGator Support beyond this is very limited.
Windows for mac osx. – I have increased memory to 128 > critical error – deleted and reinstalled and made sure to exit Virtual Box when inputting CMD commands (in admin mode) – Anything between 70 to 128mb of video memory results in critical error and anything less than 70 gives me just a black screen – checked my bios and virtualization is enabled – Made sure I replaced my machine name in the code Laptop Specs MSI Nvidia 1050 Intel core i7-7700. I have successfully logged in to my Apple account. I am getting an interesting error whenever I boot up regularly and when it reboots the machine while it tries to install Mac OS Sierra. Hi, I’ve followed all the steps for setting up mac OS X on a virtual machine.
We are not responsible for the functionality of third party email clients or their features, such as contacts, calendars, etc. For advanced options or settings, it is recommended that you seek out the developing party for your email client of choice.
Client Specific Setup Instructions. Note: While the settings listed above are the general overall settings that will operate when synchronizing to your HostGator accounts, connectivity cannot be guaranteed. The articles listed below are for common email clients that are used with HostGator email accounts and are considered general instructions.
If you seek to setup advanced settings, please confer with the developer of your particular email client or your site developer for assistance. • • • • • • • • • • • • • Additional Help We have video guides on most email clients in our, including: • •. Cual es el mejor antivirus for mac.
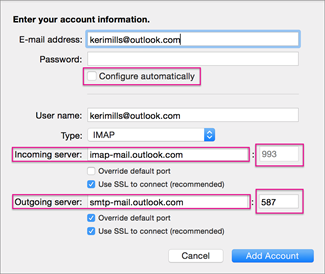
This guide takes you step-by-step through the process of setting up a new email account in Outlook for Mac. If the Mail account is already set up, but giving errors – then refer to our Troubleshooting guide.
This guide will show how to use your Outlook Express email client in conjunction with the No-IP email service. Step 1: Open Outlook Express and select “Accounts” from the Tools menu. Step 2: Under the “Mail” tab, select the account you want to modify and click “Properties”. Step 3: Click the “Servers” tab and fill in all the required information. • Server Information for the outgoing mail server (SMTP) should be smtp-auth.no-ip.com and the incoming POP3 mail server should be set to your existing mail server (provided by your ISP or a third party). • Contact your ISP or third party if you don’t know what these settings should be. If you’re using No-IP’s POP3 service, see our tips for setting up No-IP™ POP3 service with Outlook Express.
Step 4: Enable outgoing server authentication and click “Settings”. Step 5: Customize the authentication settings.

• Select “Log on using” and put yourdomain.com@noip-smtp as the Username. Note: Take care to not put an extra hyphen “-” in noip here.
• The password is one you created when setting up the Alternate Port SMTP service from within your No-IP account. • Click “OK”. Step 6: Click on the “Advanced” tab to change the SMTP server port number. • In the Outgoing mail (SMTP) field, change the port number to 3325. Click on the “OK” button to return to the previous window. Step 7: Click “Close” to save the settings and you’re done!