Configure Gmail For Outlook 2011 Mac
From the Gmail web client, click Settings (looks like a gear icon). In the Forwarding and POP/IMAP tab, click Enable IMAP. Click Save Changes. From the Tools drop-down menu, select Accounts. Click the + button and select Other Email. For Outlook 2011).
Microsoft Outlook for Mac Add Your Gmail Account to Outlook 2011 Mac Using IMAP To set up your Outlook client to work with Gmail: • Enable IMAP in Gmail • Sign in to Gmail. • Click the gear icon in the upper-right and select Gmail settings at the top of any Gmail page. • Click Forwarding and POP/IMAP • Select Enable IMAP. • Configure your IMAP client and click Save Changes. • Open Microsoft Office Outlook 2011. If you have just installed Outlook 2011 it will show in your Dock. • If you see a Welcome to Outlook screen, click Add Account.
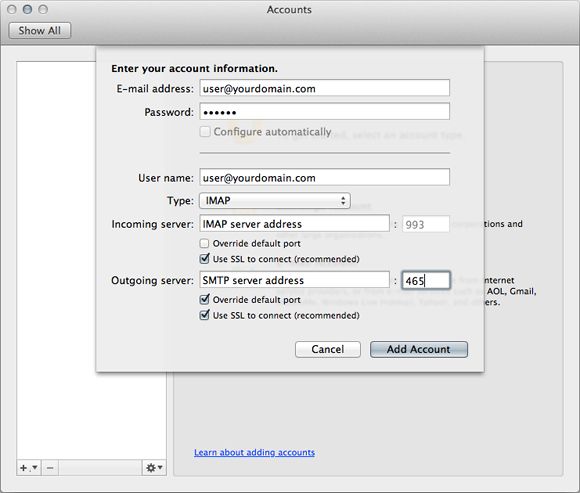
Otherwise click Tools > Accounts > Add Accountfrom the Apple Menu bar. • Click E-mail Account. • Now we need to manually enter in our settings similar to the following. Wd passport harddisk format for both windows and mac. • Enter your email address, password and user name. • Select IMAP for type • Incoming server: imap.gmail.com / Either 993 (ssl) or 143 (very infrequently 585 (ssl)) • Outgoing server: smtp.gmail.com / Either 25 or 465 (ssl) (very infrequently 2525) • Click Add Account • Click More Options. • Use Incoming server info for Authentication • Click OK If you've entered everything in correctly, task will be completed successfully and you can close out of the window and begin using your account via Outlook 2011 mac.
Import your old POP account into the newly created IMAP account If you currently keep a copy of your mail on the server, then you're done! But if you delete them from the server, then you have to import your old POP mail into your IMAP. Here's how to do it • Click the Tools tab • Click Import • Click Outlook Data File (.pst or.olm), and then click the right arrow to continue. Mac os sierra dmg for windows. • Select (.pst) or (.olm) • Browse, your backup (.pst) or (.olm) file to import • Done • Now you can check your back up data on outlook • And the very important thing is you have to disable your old POP account from the Outlook, Otherwise they will continue to receive email in the old POP account.
• Go to Account settings • Delete your old pop account Setting up your Sent folder properly • From the Accounts window, select Advanced. • Click Folders. • From the Sent drop-down, select Sent Mail (Server).